LANGUAGE:
- WHAT WE DO
- GENERATIVE AI
We create, transform, test, and train more content than anyone in the world – from text, voice, audio, video, to structured & unstructured data.
Leverage AI-powered technology to bolster your global communications.

- Industries
- LAⁱNGUAGE CLOUD™
Our experts know the in-and-outs of your industry & its challenges.
Harness the Lionbridge Lainguage Cloud to support your end-to-end localization and content lifecycle.
- WHO WE ARE
Our people are our pride, helping companies resonate with their customers for 20+ years.
We create, transform, test, and train more content than anyone in the world – from text, voice, audio, video, to structured & unstructured data.
Content Services
- Technical Writing
- Training & eLearning
- Financial Reports
- Digital Experience Assessments
- Digital Marketing
- Content Optimization
Translation Services
- Video Localization
- Software Localization
- Website Localization
- Translation for Regulated Companies
- Interpretation
- Live Events
Testing Services
- Functional QA & Testing
- Compatibility Testing
- Interoperability Testing
- Performance Testing
- Accessibility Testing
- UX/CX Testing
Solutions
- Translation Service Models
- Machine Translation
- Start Onboarding™
Our Knowledge Hubs
- Positive Patient Outcomes
- Modern Clinical Trial Solutions
- Future of Localization
- Innovation to Immunity
- COVID-19 Resource Center
- Disruption Series
- Patient Engagement
- Lionbridge Insights
Leverage AI-powered technology to bolster your global communications.
Generative AI
GenAI Marketing Solutions
Our experts know the in-and-outs of your industry & its challenges.
Life Sciences
- Pharmaceutical
- Clinical
- Regulatory
- Post-Approval
- Corporate
- Medical Devices
- Validation and Clinical
- Regulatory
- Post-Authorization
- Corporate
Banking & Finance
Retail
Luxury
E-Commerce
Games
Automotive
Consumer Packaged Goods
Technology
Industrial Manufacturing
Legal Services
Travel & Hospitality
Harness the Lionbridge Lainguage Cloud to support your end-to-end localization and content lifecycle
Lainguage Cloud™ Platform
Connectivity
Translation Community
Workflow Technology
Smairt Content™
Smairt MT™
Smairt Data™
Language Quality
Analytics
Our people are our pride, helping companies resonate with their customers for 20+ years.
About Us
Key Facts
Leadership
Insights
News
Trust Center
SELECT LANGUAGE:

Quickly Secure Translations in Four Easy Steps
Whether you’re a first-time user of Lionbridge’s online translation ordering platform or need a refresher on the tool — this page is for you.
Our straightforward instructions will enable you to start ordering translations instantaneously. The process is fast and easy:
Upload a document or input text into the Lionbridge order form.
Get an instant quote.
Order a translation via the website.
Gengo, A Lionbridge Company, hosts the Lionbridge online ordering platform. Follow the detailed steps below.
Using our self-serve platform involves four basic steps:
1. Place Your Order
2. Track your translation
3. Approve, Request Corrections, or Reject Your Translation
4. Provide Feedback
Let’s look at each step in greater detail.
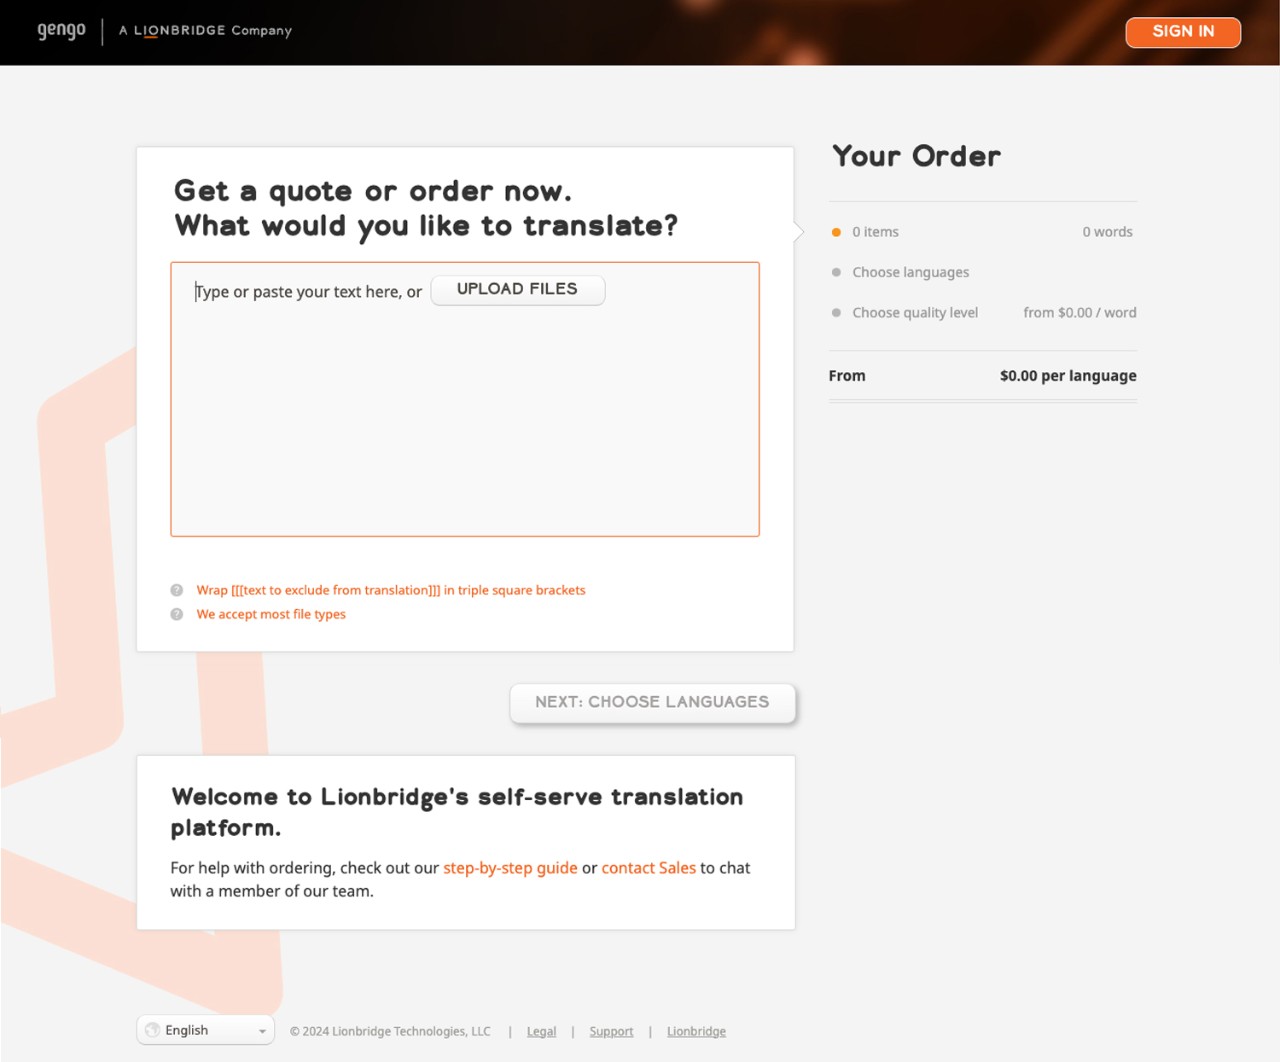
1. Loading your content in the order form
There are two ways to load your content into the Lionbridge order form. Either input your text directly into the form via copy-paste or upload files via drag and drop.
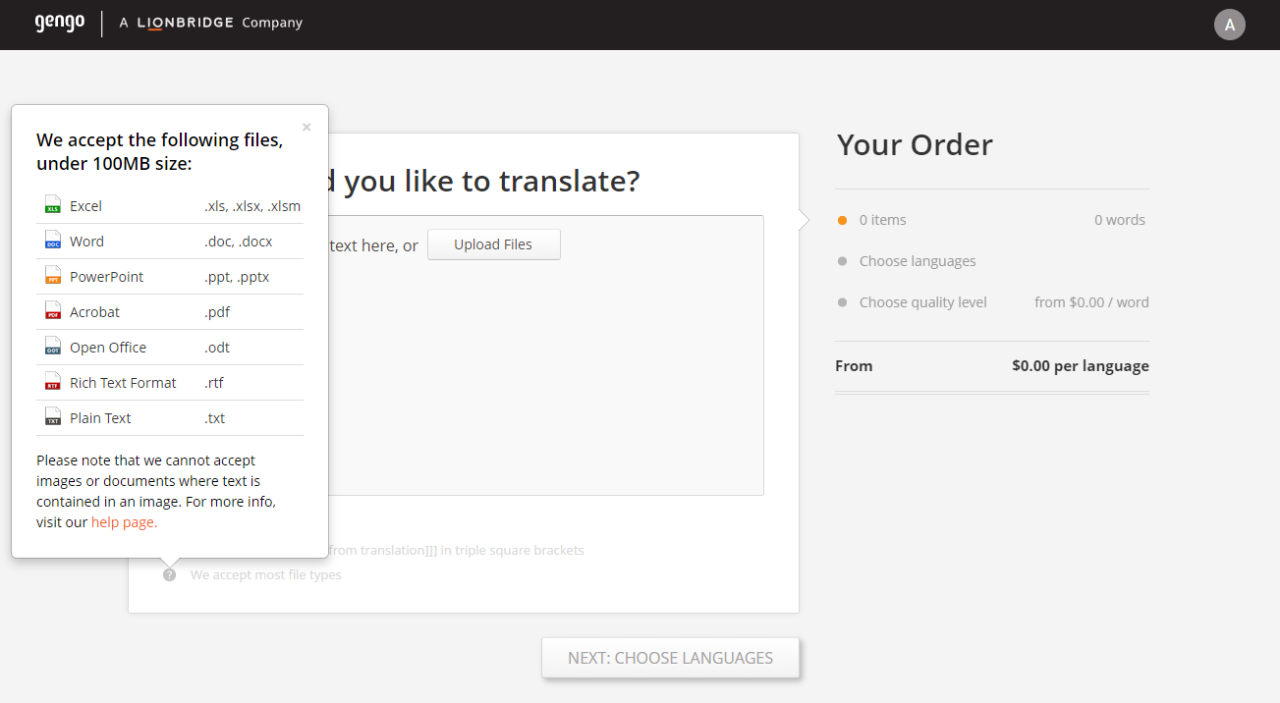
A complete list of supported file types is provided under the text field, as shown in the screenshot below.
If you do not want to translate particular words contained in your text, wrap them in [[[triple square brackets]]], as shown below. This action stops the words in brackets from being included in your word count.
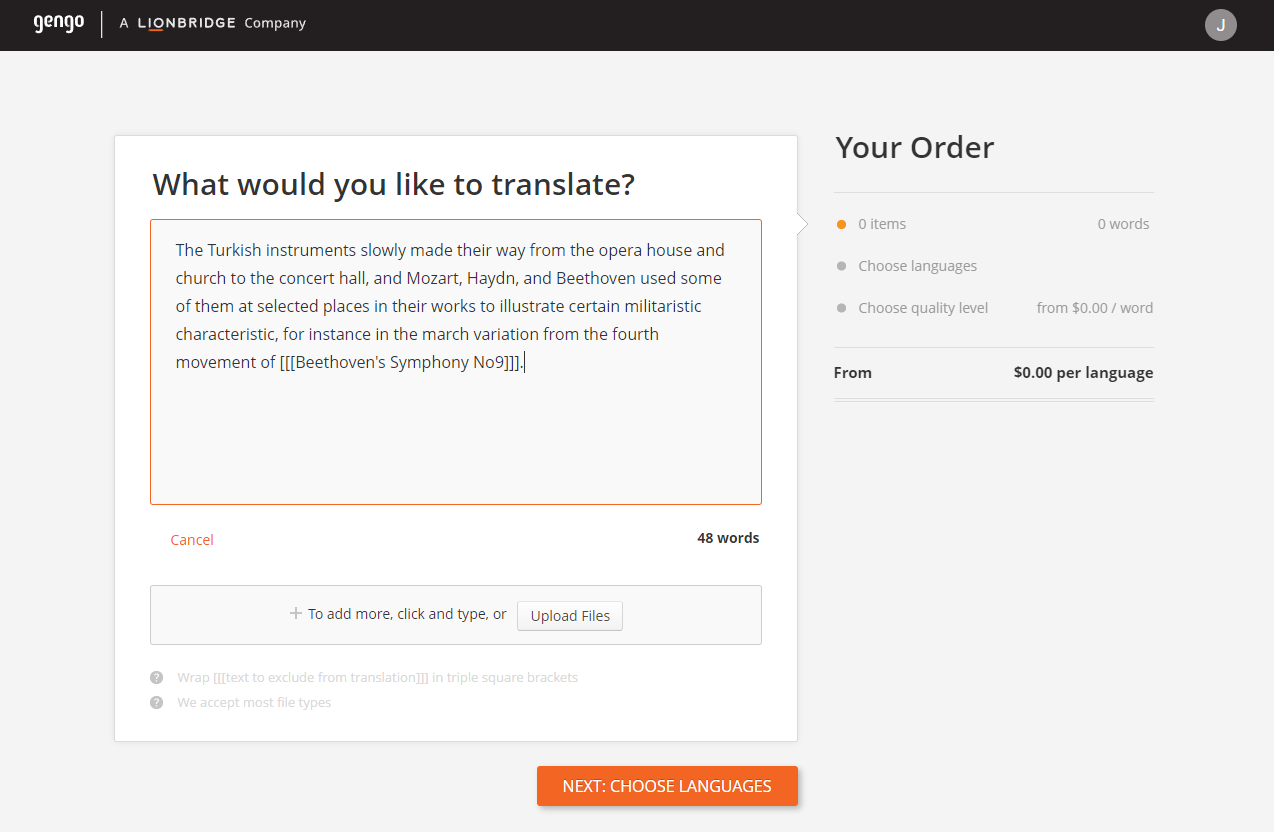
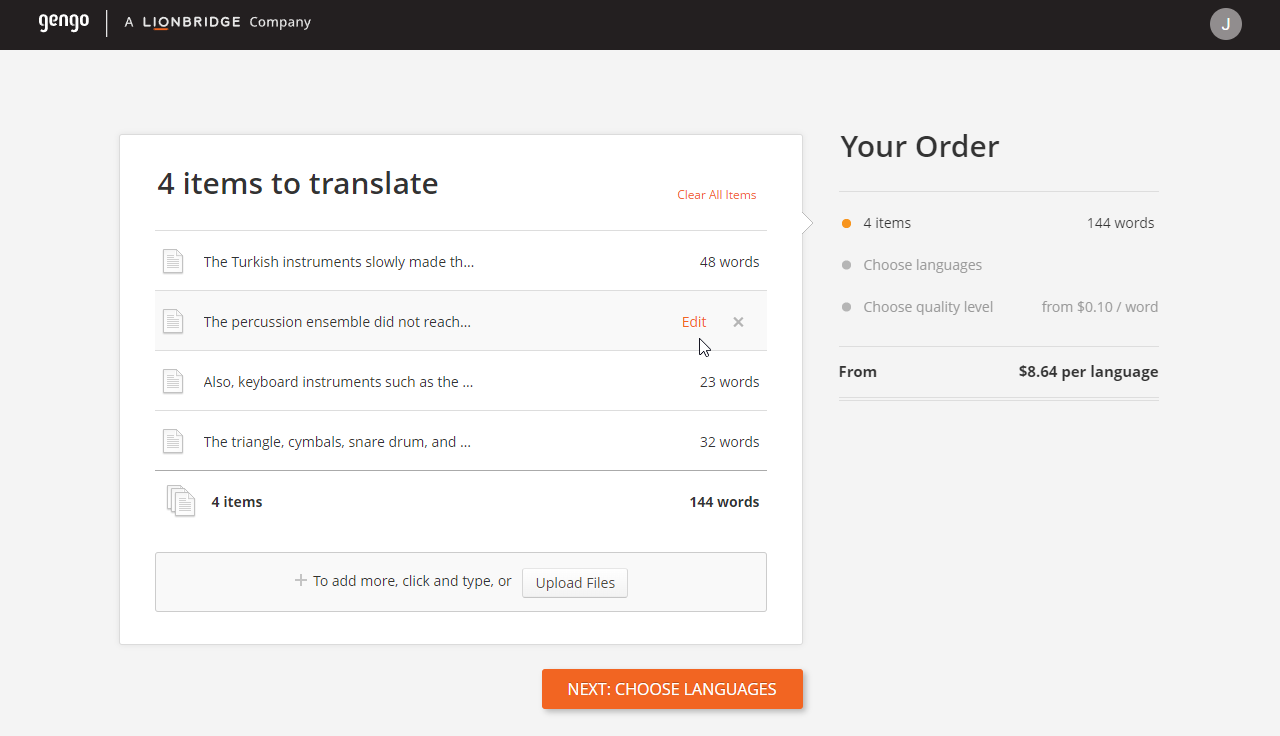
You may upload multiple pieces of text and files at once. If you entered text directly into the order form, you may make edits by hovering over each piece.
The tool provides a word count for each piece within your order and generates an estimated price-per-language cost, as shown below.
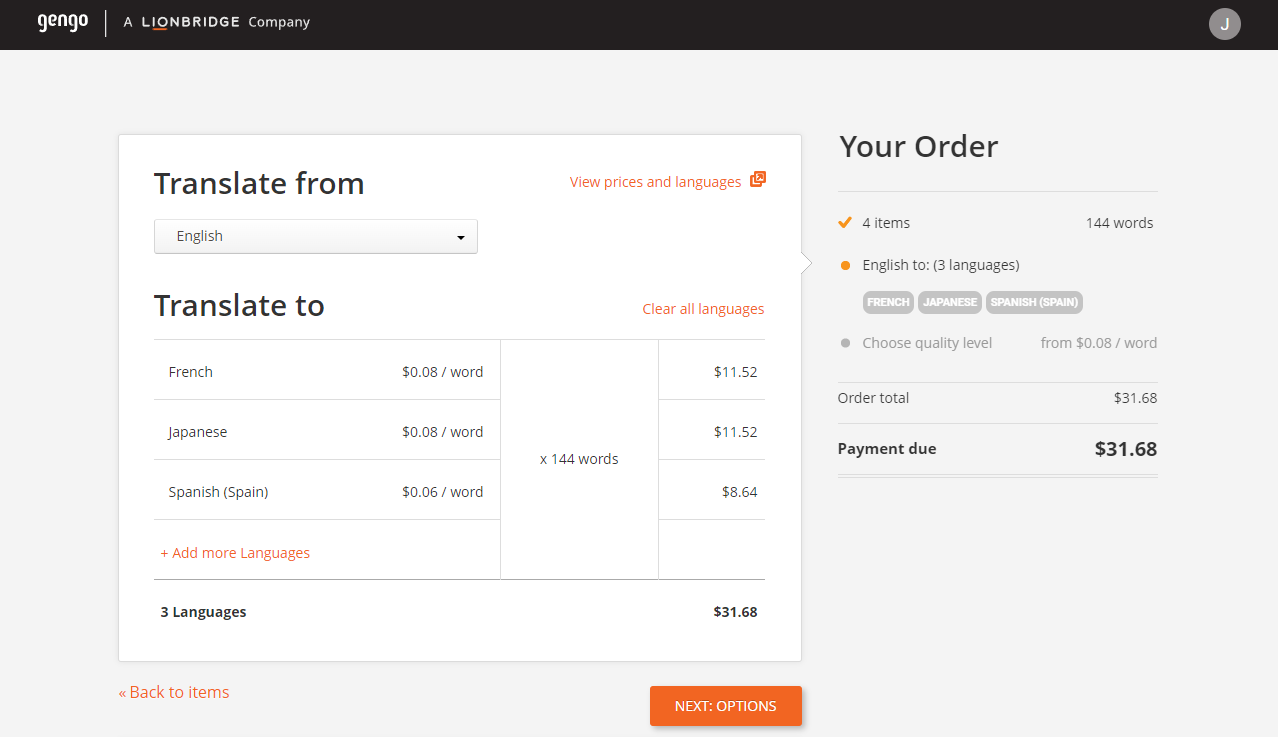
2. Selecting languages for translation
After loading your text, you will need to select your target languages.
Lionbridge will autodetect your source text's language, but you may change the source language manually if it’s incorrect. When your source language is English, you can choose from more than 30 target languages, as displayed below.
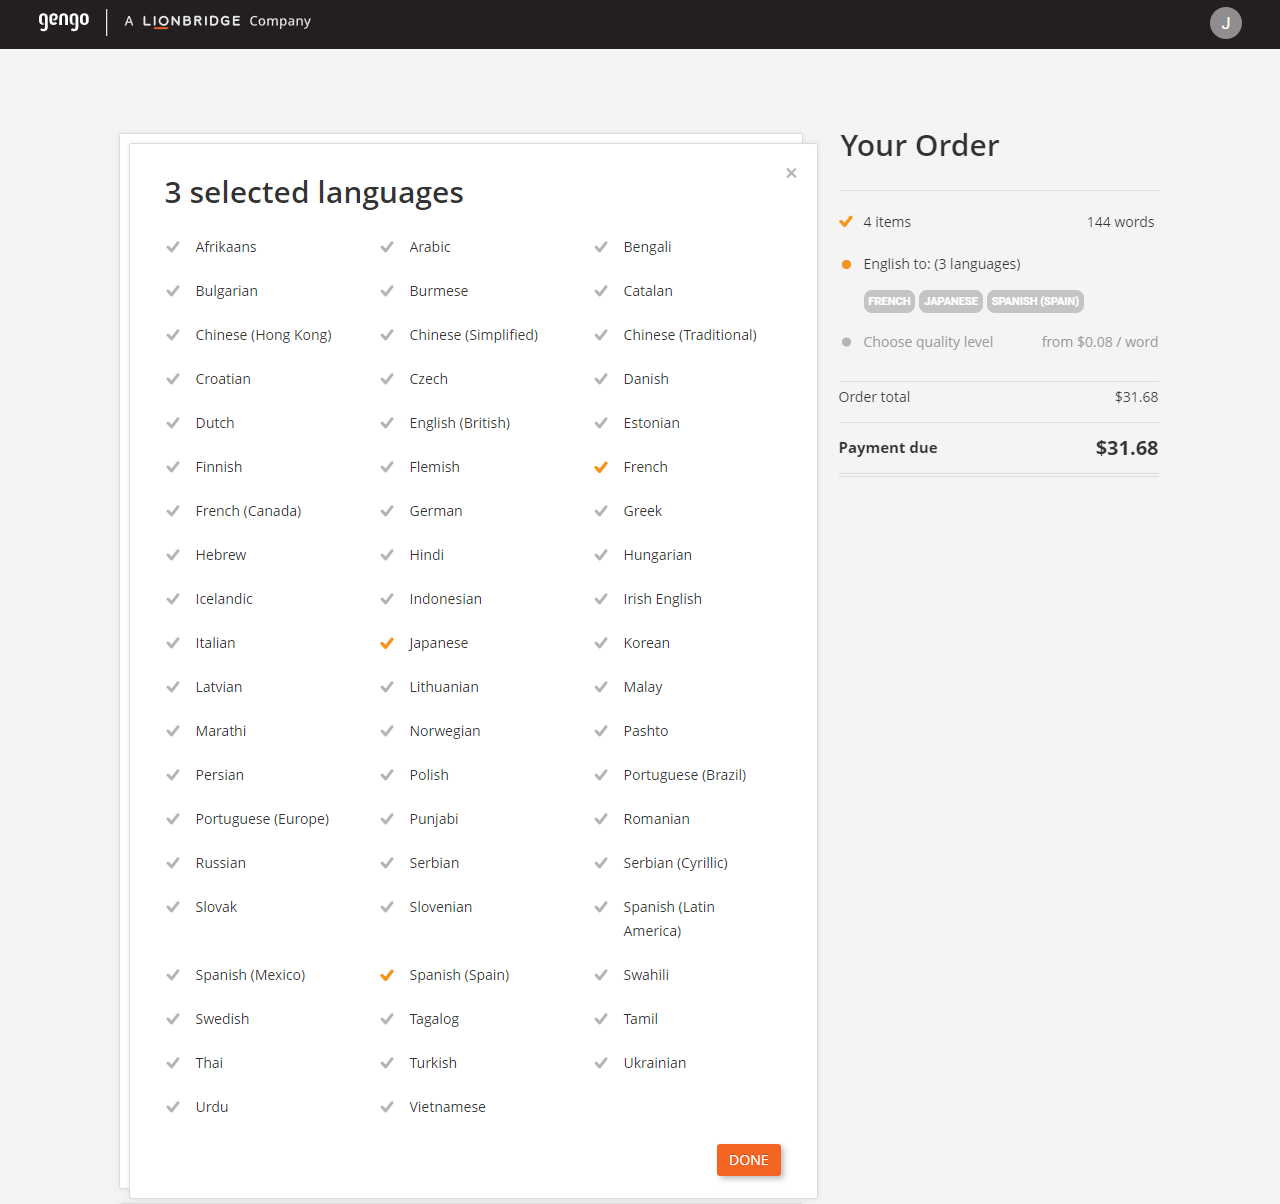
Once you've chosen your target languages, you will see an itemization of word counts and prices for all languages. The link in the upper right-hand corner will take you to a detailed explanation of our Pricing and languages.
3. Selecting service level, purpose, and tone
It is imperative to identify the following things to achieve the desired translation outcome:
- The content type that most suits the audience you are targeting
- The purpose, or general quality level of your translation, for which there are two options — regular quality or extra quality assurance
- The wanted tone
You may select from preset content types and purposes, as shown below.
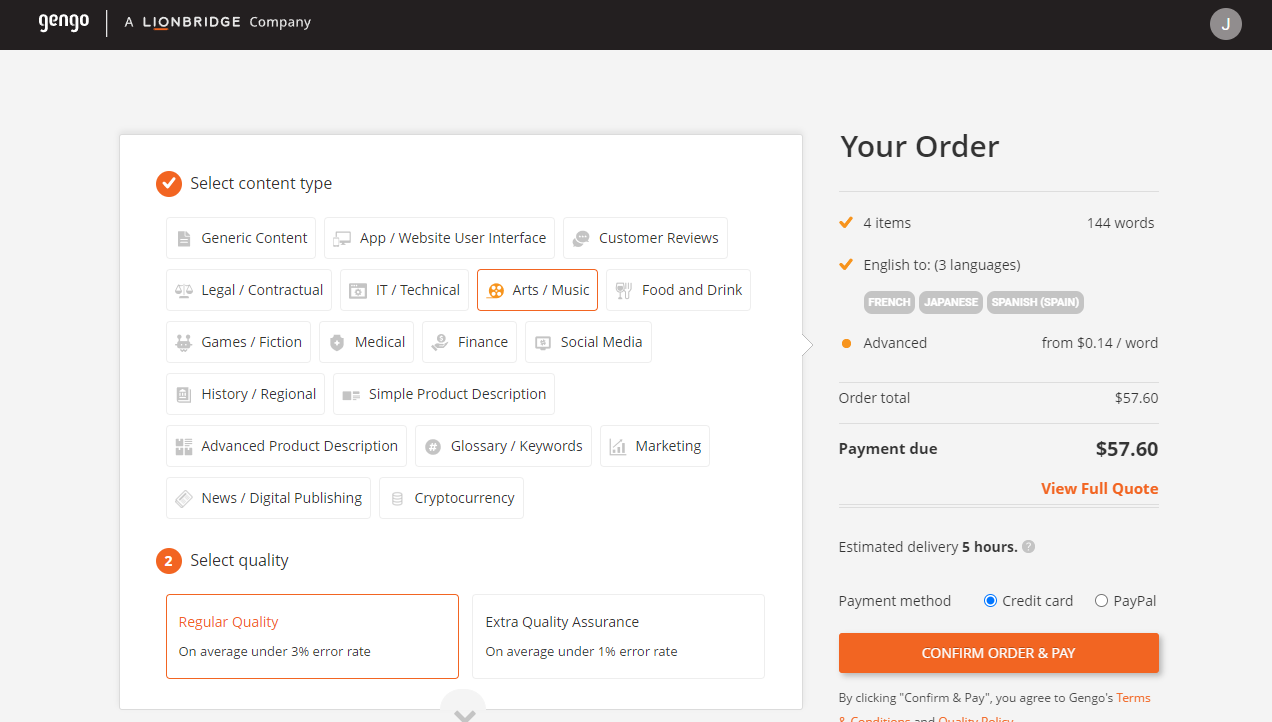
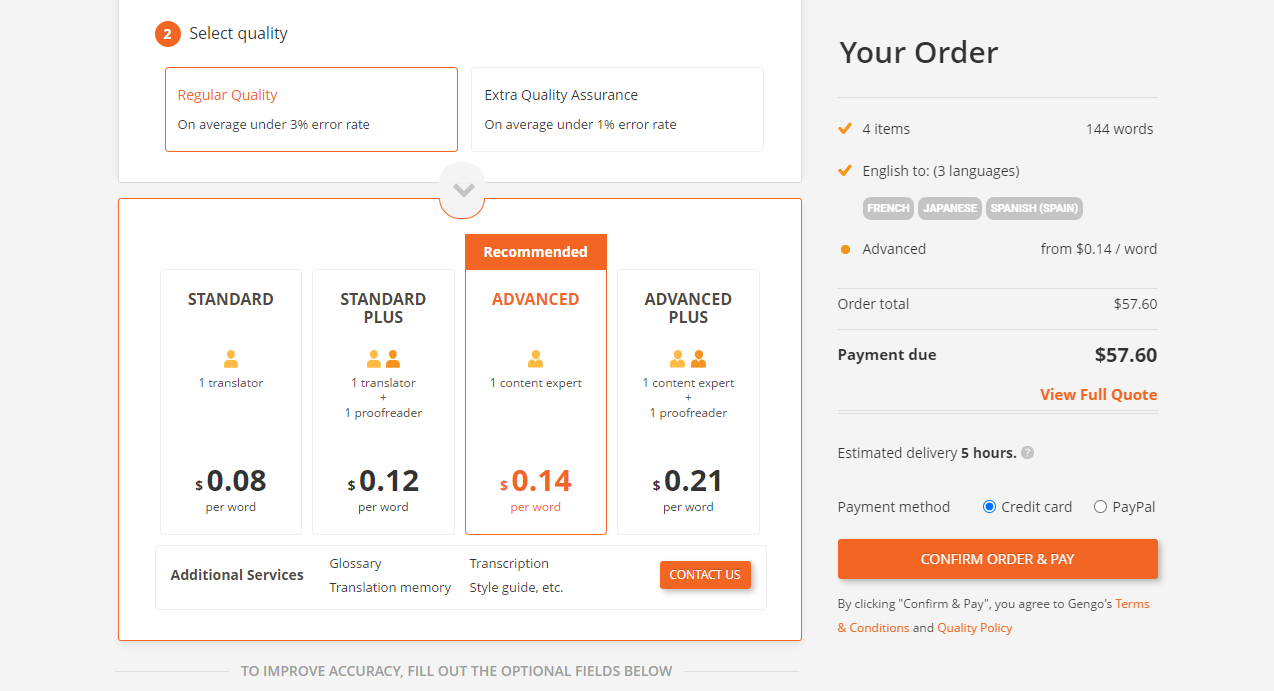
Once you choose your content type and purpose, the platform automatically matches your desired quality to the appropriate service level, though you may manually change the service level if desired.
- Our Standard and Advanced service offerings achieve regular quality levels. Standard services are typically suitable for generic content like blogs or emails. Advanced services are ideal for more formal content, such as magazine articles or instructional manuals.
- Our Standard Plus and Advanced Plus service offerings provide extra quality assurance. A second translator will proofread the translation to ensure authenticity as part of these services.
Note: Standard Plus service offerings are currently only available for direct text input orders, not file orders.
You may obtain a more detailed explanation of Lionbridge’s quality levels in our Quality Policy statement and in this informational piece.
Under the optional fields, you may:
- Add a term glossary (if you have uploaded one previously, and only for text orders).
- Group your order so that only one translator works on all your jobs (only for text orders).
- Use your preferred translators, if you have previously added two or more translators for each language pair to your preferred translator list.
To enhance the speed and quality of your translation, we recommend specifying the desired tone of your text and providing instructions for the translator. You can also help translators achieve your desired outcome by including additional information, such as identifying your target audience, providing links to your website, or providing previous translations for reference.
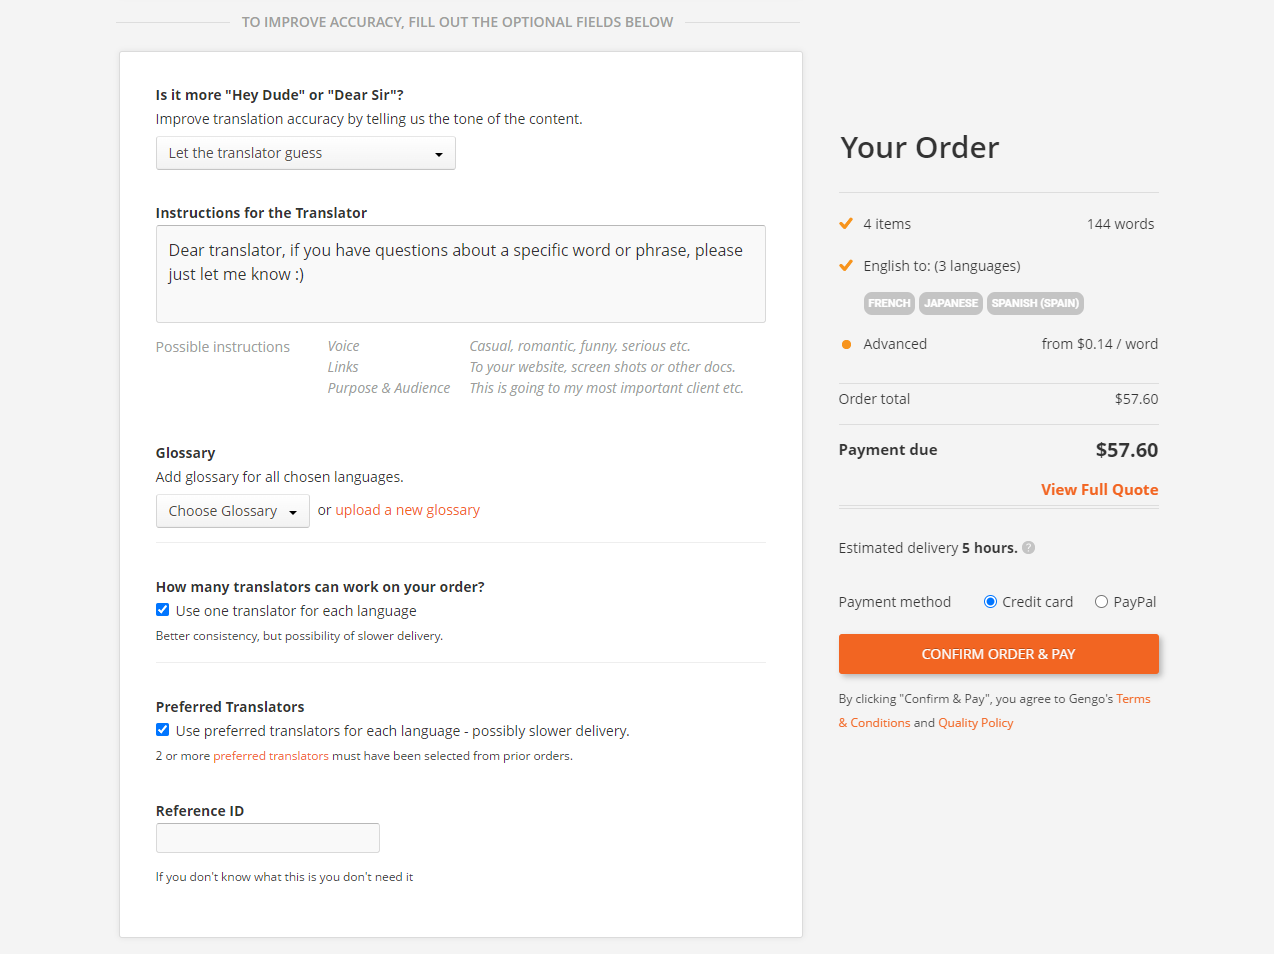
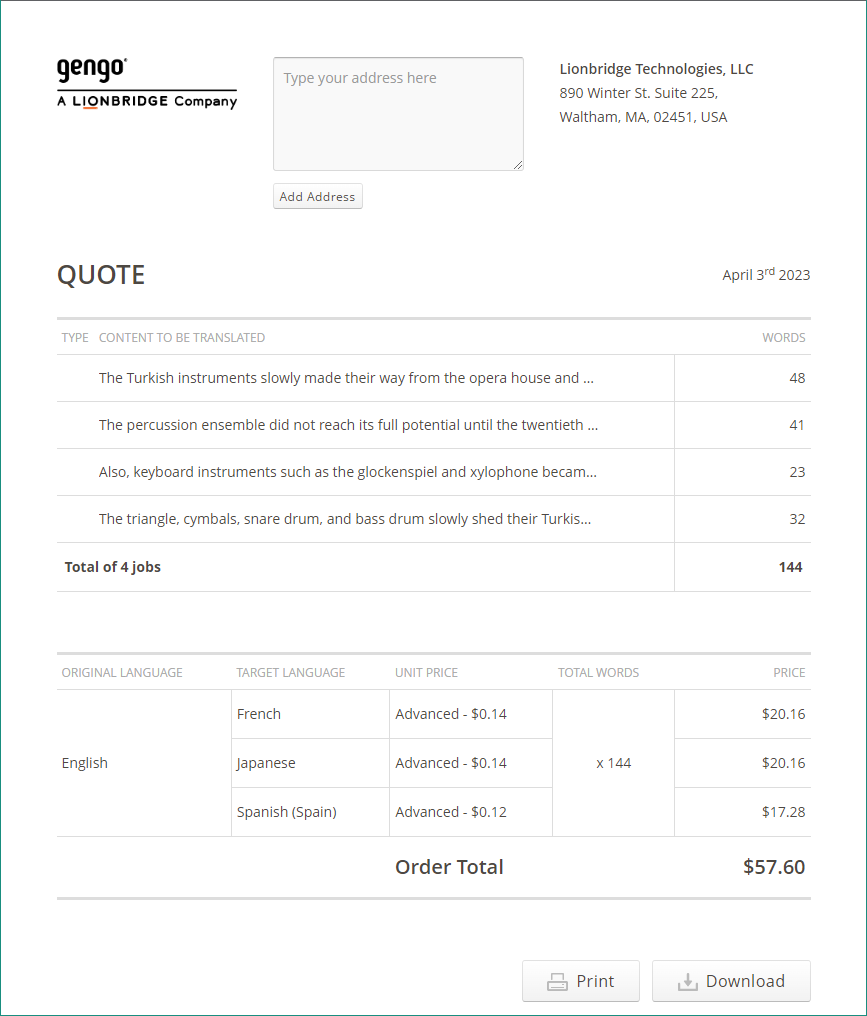
After completing the above steps, click on "View Full Quote" — located under the total price — to view a detailed quote, as shown below. This screen lets you print the quote as a PDF for your records.
4. Viewing, confirming, and paying for your order
If you have sufficient credits in your account, you may click the orange "Confirm Order & Pay" button, and the system will deduct the credits from your account balance without asking you to pay. Learn how to top up credits here.
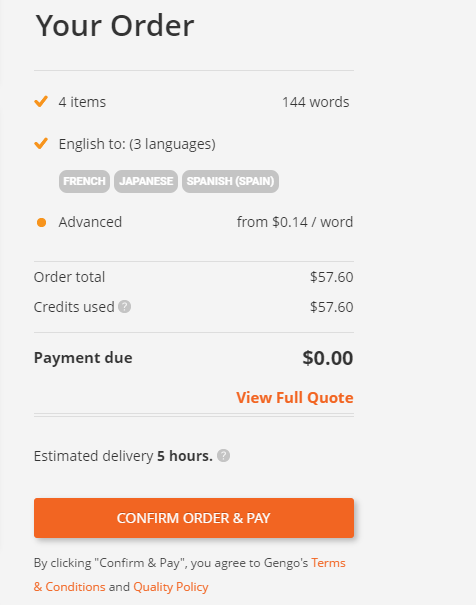
To add credits to your account, select your preferred payment method — credit card or PayPal — and click the orange "Confirm Order & Pay" button. Find more info about our payment methods here.
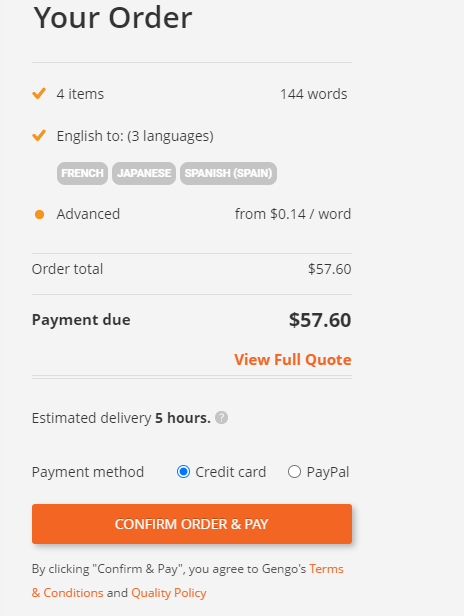
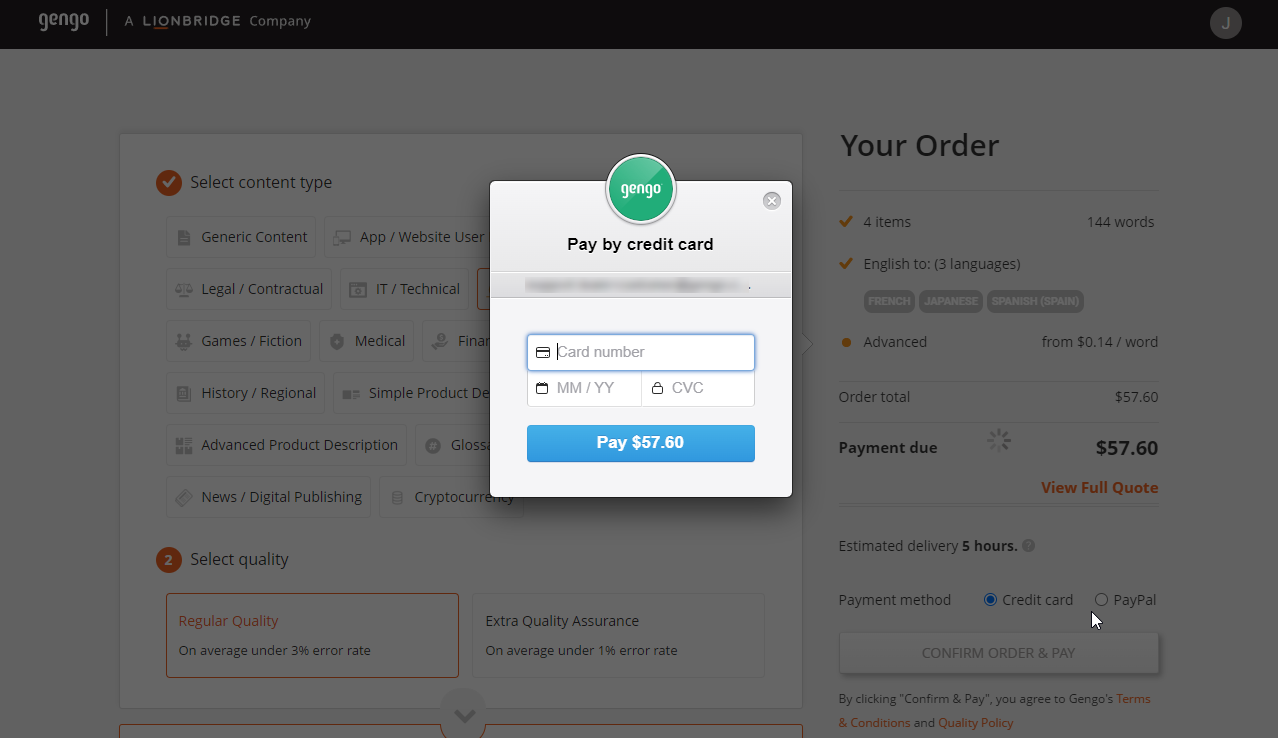
If you choose the credit card option, a window will pop up where you can enter your credit card information and click the blue "Pay" button.
If you choose the PayPal option, you will be directed to a new page where you can log in and pay with your PayPal account. If you don't have a PayPal account, PayPal may allow you to pay with your credit/debit card as a guest. This feature depends on your location.

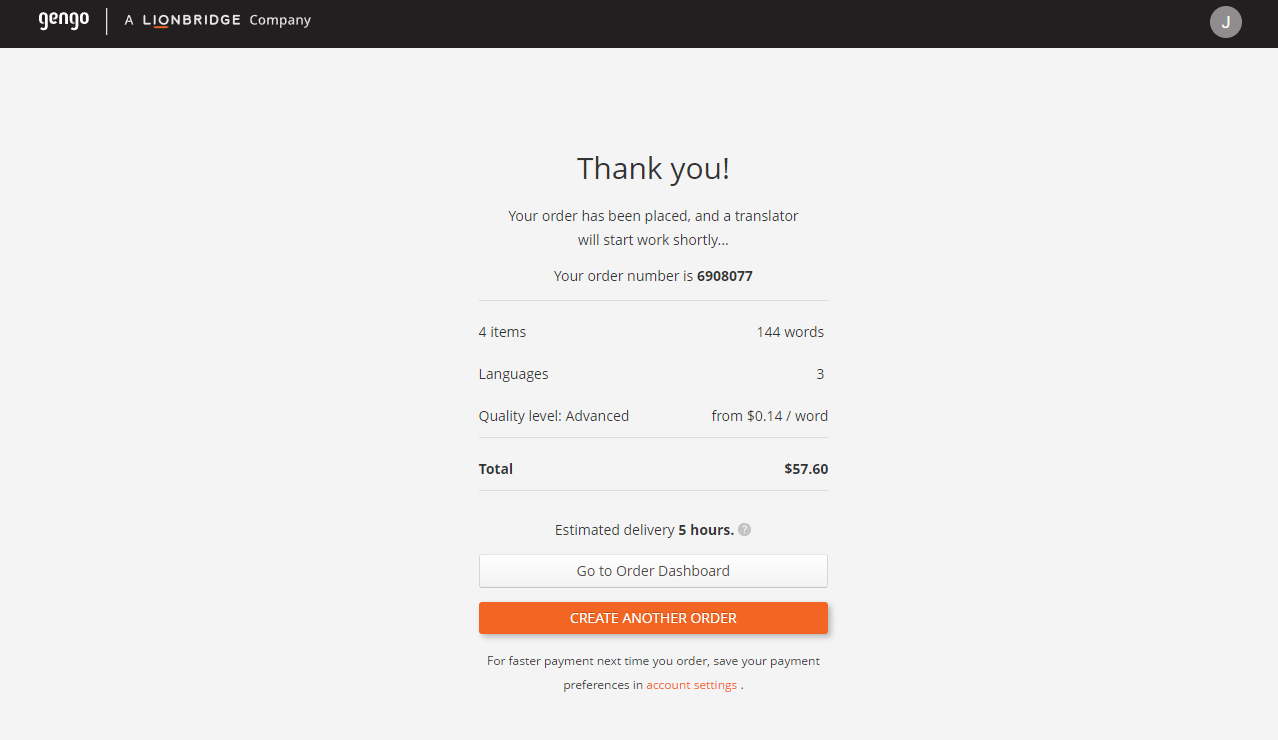
You have completed the order process once you’ve addressed payment.
The following things will happen next:
- You will be automatically redirected to a confirmation screen where you can see your Order ID.
- You will receive a confirmation email.
- The job will be sent to the first available member of the Lionbridge translation team.
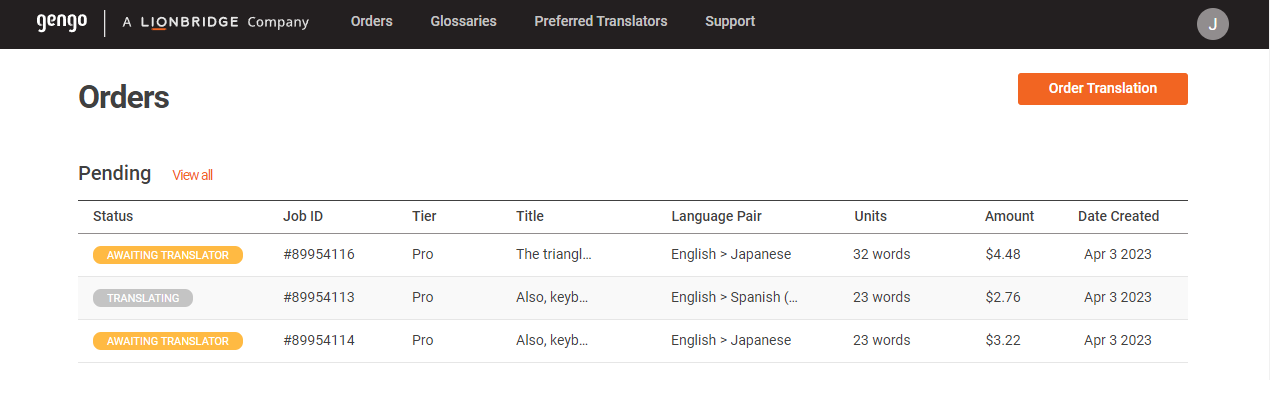
Step 2: Track Your Translation
After confirming your order, you may track the status of your jobs via your Dashboard. Translations in the "Pending" section are jobs in progress, as shown in the screenshot below.
Canceling your order
You may cancel a job that is still "Awaiting translator."
Once a translation team member has picked up a job, the platform will automatically change the status of that job to "Translating." You may no longer cancel the job from the Dashboard at this stage.
If you need to cancel a job that a translator is already working on, you may open a support ticket, and we'll do our best to accommodate you. Find out more about our cancelation procedure here.
Communicating with your translator
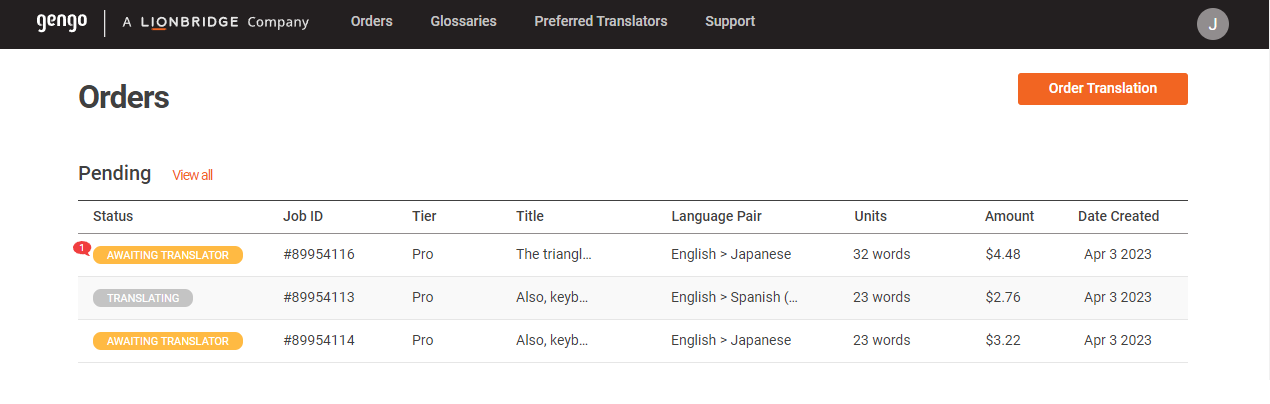
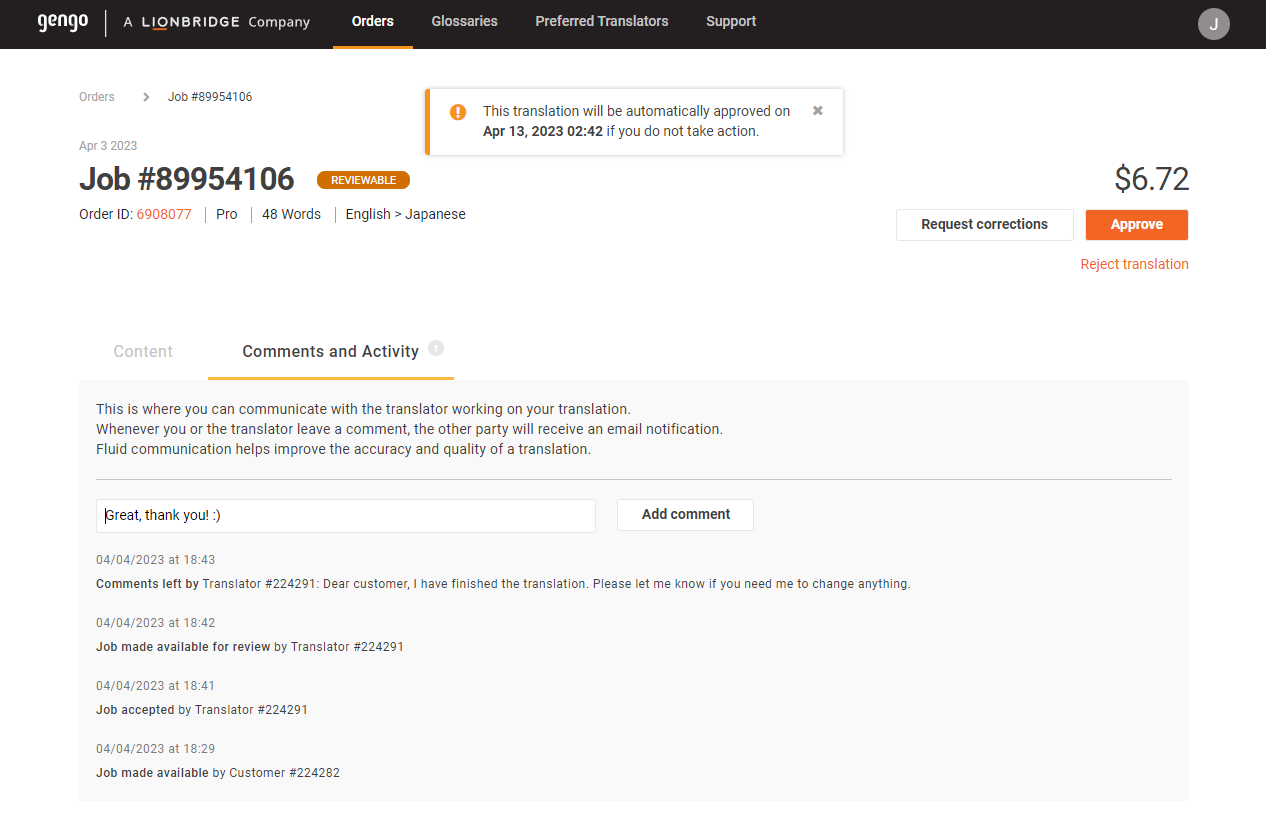
Translators may have a question while working on a job. If this happens, the translator will leave a comment in the Dashboard, asking for clarification.
You will receive an email notification each time the translator has left a new comment. You can identify unread comments by a red bubble in the Status column of your Dashboard, as shown below.
The translator has let the customer know the translation has been completed in the example below. The customer may then type a quick thank you response and hit submit. Learn more about communicating with your translator here.
Step 3: Approve, Request Corrections, or Reject Your Translation
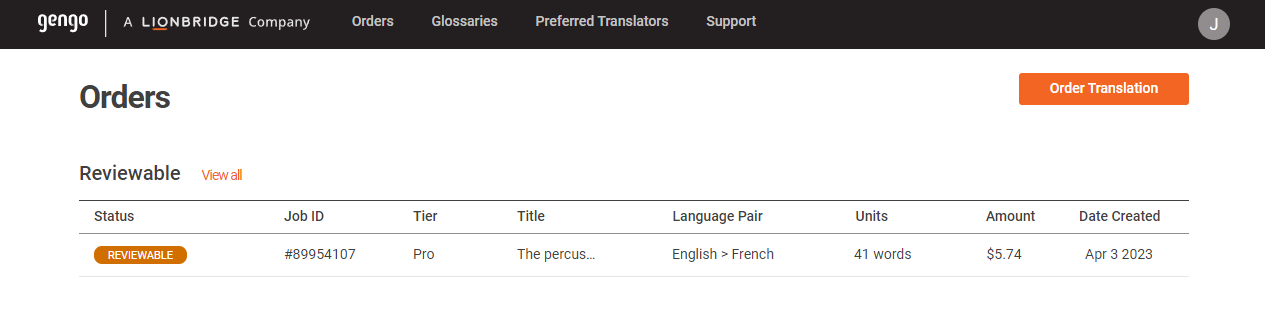
You will automatically receive a notification email when the translator has completed your job. The job status will also be updated on your Dashboard, appearing as "Reviewable" in orange.
The job details page will show a preview of your translation. You can copy the text or download a translated file to check the quality of the translation. You then have three options:
- Approve the translation.
- Request translation corrections.
- Reject the translation.
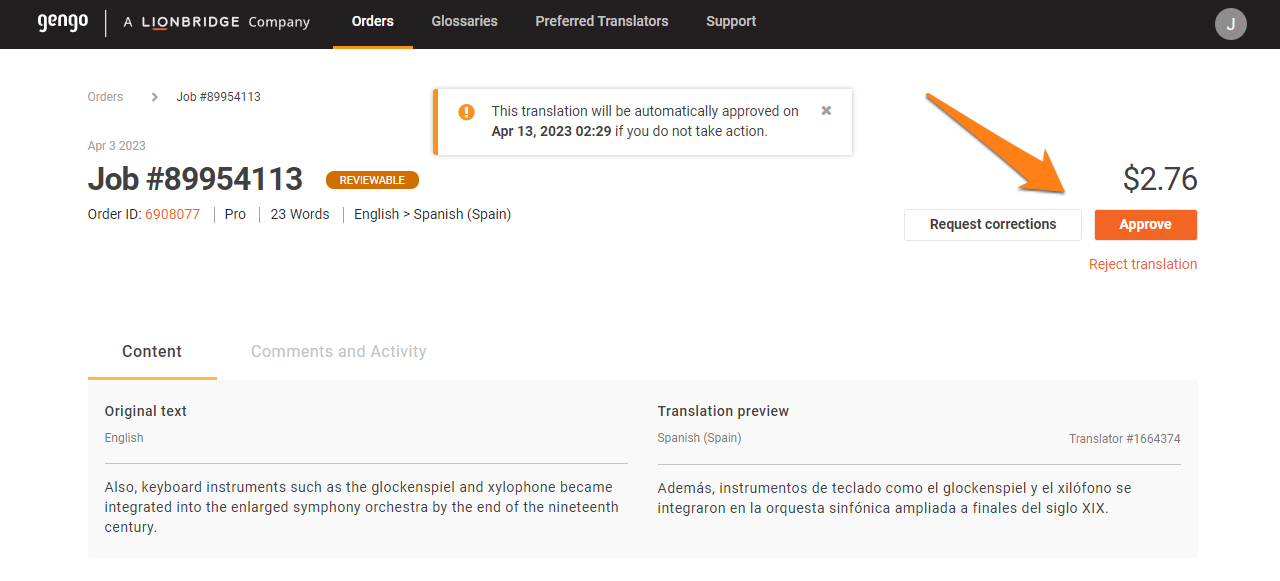
Approve the translation
If satisfied with the resulting translation, click the "Approve" button. You will have 120 hours to approve your translation before our system automatically approves it. We will pay the translator once the job is approved.
Request translation corrections
We have safeguards to ensure our translators submit error-free translations the first time. However, if you want the translator to make a small change, you may initiate this action by clicking the "Request corrections" button.
Reject the translation
Our customers reject only a tiny percentage of our translations. If you feel the translation does not meet our quality standards, you may reject the work by clicking the “Reject translation” button and pass the work on to another translator or request a refund. Our Translation Management team will review the translation and contact you ASAP.
You may find more information on our Quality Policy Page.
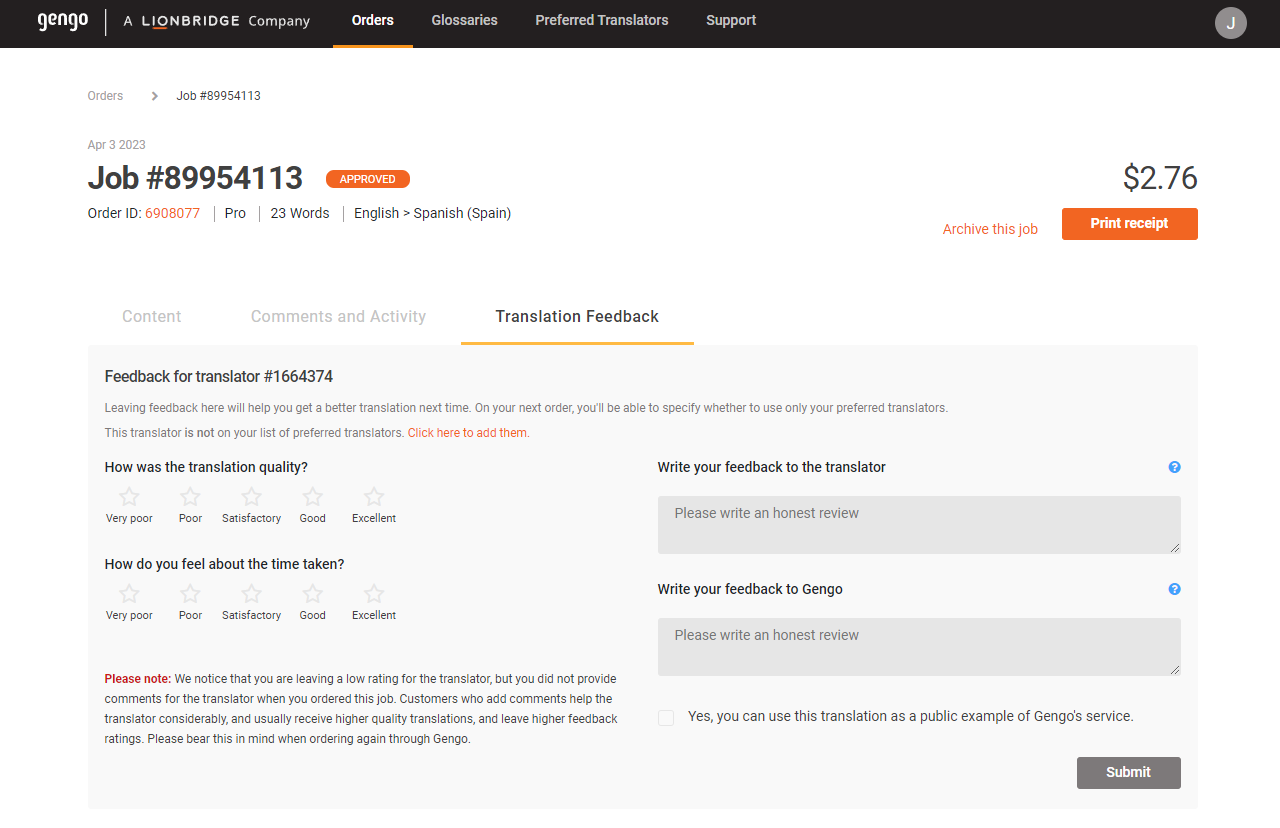
Step 4: Provide Feedback
After approving a translation, we'd appreciate your feedback.
Rate the turnaround time and the quality of your translation. You can also leave a message for both the translator and the Lionbridge team.
At this stage, after you have approved the job, there is no way to request changes or receive a refund via the Dashboard. However, we want everyone to get a great translation, so if you do find issues after approving your translation, please open a support ticket to address them. We’ll do our best to find a satisfactory resolution.
Still Have Questions?
We hope you found this tutorial helpful. If you still have questions or wish to request new features on our platform, open a support ticket.
We’re here to help and look forward to supporting you with all your translation needs.